Razer Synapse showing “PLEASE CONNECT A RAZER SYNAPSE ENABLED DEVICE”

What we’ll need to do is add Razer to the allowed developers for kernel extensions — we’ll basically add the Razer ID (R2H967U8J8) to the list of allowed kernel extension developers.

  1. Boot into recovery mode (Restart your mac and hold ⌘+ R during startup. (Command + R)
  2. Go to Utility → Terminal
  3. Type “/usr/sbin/spctl kext-consent add R2H967U8J8” and press Enter
  4. Type “/usr/sbin/spctl kext-consent list” and press Enter
  5. When executing the command, you’ll see a list of Allowed Team Identifiers in the terminal. Make sure the Razer ID (R2H967U8J8) is inside this list. Afterwards, just reboot your machine (you can execute ‘reboot’ in the terminal).
  6. Type “csrutil disable” and press Enter

Restart Mac and open termial:
1. Enter “sudo kextload /Library/Extensions/RazerHid.kext” and press Enter

Inside System Preferences → Security & Privacy, you will need to unlock the settings by clicking on the lock icon in the bottom left. Enter your user credentials and you’re ready to approve the kernel extension. There should be a note at the bottom where you can click “Open Anyway”.

You might need to reboot again. Afterwards, just launch Razer Synapse, connect your device. It should now be detected and everything should be working!

The last thing is that you have to go to recovery mode and enable csrutil by “csrutil disable”

Posted in Mac | Tagged | 1 Comment

SwiftUI: State, StateObject, ObservedObject, ObservableObject

State

A property wrapper type that can read and write a value managed by SwiftUI.
SwiftUI manages the storage of any property you declare as a state. When the state value changes, the view invalidates its appearance and recomputes the body. Use the state as the single source of truth for a given view.

A State instance isn’t the value itself; it’s a means of reading and writing the value. To access a state’s underlying value, use its variable name, which returns the wrappedValue property value.

ObservableObject

A type of object with a publisher that emits before the object has changed.

  • ObservableObject是Combine框架下的协议类型,针对引用类型设计,用于在多个View之间共享数据
  • 遵循ObservableObject协议的类型,需要实现objectWillChange属性,最简单的实现方式是使用系统提供的@Published,添加到对应需要监听的属性上,这个属性一般不能设置为private,因为可以被外部修改,但如果提供对外方法进行修改,可以改为private(set),即setter方法私有,getter方法默认等级
  • 标记为@Published的属性在属性变化前发出变化值,使得对象类型的某个属性的数据改变得以被监听,并发出信号通知View更新
  • 属性中添加@Published的值类型会在值变化后发出信号,比如struct,如果添加引用类型(嵌套对象)目前会有问题,它的属性变化不会发出信号,需要额外特殊处理(TODO)
  • ObservableObject协议有一个名称为objectWillChange的publisher,他有几个特点: 这个publisher不发送数据 这个publisher不会失败,即Failure是Never 这个publisher只是发通知,Notification的作用 objectWillChange的类型是ObjectWillChangePublisher. 同时在ObservableObject协议的扩展中,系统默认已经实现了objectWillChange

StateObject

  • 针对引用类型设计,当View更新时,实例不会被销毁,与State类似,使得View本身拥有数据
  • @StateObject 和 @ObservedObject 的区别就是实例是否被创建其的View所持有,其生命周期是否完全可控。
  • StateObject行为类似ObservedObject对象,区别是StateObject由SwiftUI负责针对一个指定的View,创建和管理一个实例对象,不管多少次View更新,都能够使用本地对象数据而不丢失
  • @StateObject就是一个针对 class 的 @State 升级版

StateObject两种初始化方式

定义时直接赋初值

@StateObject var counter: Counter = Counter() //1

通过Property wrapper的init方法赋值

@StateObject var counter: Counter

    init(counter: Counter) {
        self._counter = StateObject(wrappedValue: counter)  //2
       //self.counter = counter   //3
    }

注释2处是正确方式,注释3处是错误的,提示Cannot assign to property: 'counter' is a get-only property
那么第二种通过wrappedValue进行初始化的方式什么时候需要使用呢?这与你希望为状态设置初始值的原因是相同的:如果你特别希望根据视图的参数设置初始值,然后让视图从那里管理状态,你就需要这种方式。

ObservedObject

  • 只是作为View的数据依赖,不被View持有,View更新时ObservedObject对象可能会被销毁
  • 适合数据在SwiftUI外部存储,把@ObservedObject包裹的数据作为视图的依赖,比如数据库中存储的数据
  • @StateObject的声明周期与当前所在View生命周期保持一致,即当View被销毁后,StateObject的数据销毁,当View被刷新时,StateObject的数据会保持;而ObservedObject不被View持有,生命周期不一定与View一致,即数据可能被保持或者销毁;
Posted in iOS | Tagged | Leave a comment

How to delete an App from command line

1. List all simulators

Find out all simulators

xcrun simctl list

Find out active simulator

xcrun simctl list | grep Booted

You will get the result like:

$ xcrun simctl list |grep Booted
iPhone 11 (AE8852AB-378E-47FB-BD23-4CF77BFBC6DC) (Booted)

Now you can erase the simulator by

xcrun simctl erase AE8852AB-378E-47FB-BD23-4CF77BFBC6DC

2. Delete the app from active simulator

xcrun simctl uninstall booted your.bundle.id

Or

xcrun simctl uninstall AE8852AB-378E-47FB-BD23-4CF77BFBC6DC your.bundle.id

reference:

https://medium.com/xcblog/simctl-control-ios-simulators-from-command-line-78b9006a20dc

Posted in iOS | Tagged | Leave a comment

Combine Asynchronous Programming

1 Combine basics

  • Combine is a declarative, reactive framework for processing asynchronous events over time.
  • It aims to solve existing problems, like unifying tools for asynchronous programming, dealing with mutable state and making error handling a starting team player.
  • Combine revolves around three main types: publishers to emit events over time, operators to asynchronously process and manipulate upstream events and subscribers to consume the results and do something useful with them.

The three key moving pieces in Combine are publishers, operators and subscribers
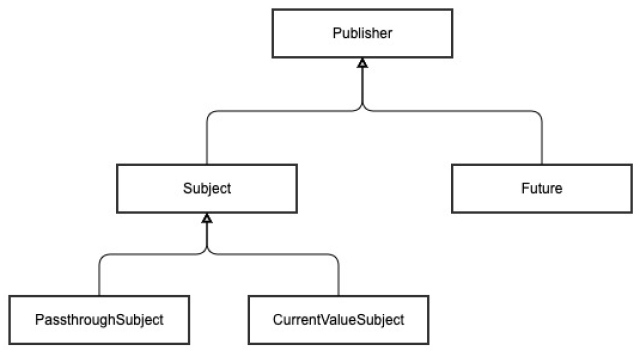
1.1 Publishers

Publishers are types that can emit values over time to one or more interested parties, such as subscribers. Regardless of the internal logic of the publisher, which can be pretty much anything including math calculations, networking or handling user events, every publisher can emit multiple events of these three types:
1. An output value of the publisher's generic Output type.
2. A successful completion.
3. A completion with an error of the publisher's Failure type.

Take a look at the Publisher protocol and one of its most crucial extensions:

public protocol Publisher {
  associatedtype Output
  associatedtype Failure : Error
  func receive<S>(subscriber: S) where S: Subscriber, Self.Failure == S.Failure, Self.Output == S.Input
}
extension Publisher {
    public func subscribe<S>(_ subscriber: S) where S : Subscriber,
    Self.Failure == S.Failure,
    Self.Output == S.Input
}

The associated types are the publisher’s interface that a subscriber must match in order to create a subscription.

1.1.1 Primitive value type Publisher

  • Just, it’s a publisher that emits its output to each subscriber once and then finishes.
let just = Just("Hello world!")
_ = just.sink(
    receiveCompletion: {
        print("Received completion", $0)
    },
    receiveValue: {
        print("Received value", $0)
    })

1.2. Operators

Operators are methods declared on the Publisher protocol that return either the same or a new publisher. That's very useful because you can call a bunch of operators one after the other, effectively chaining them together.

1.2.1 sink(_:_:)

The sink(_:_:) operator allows you to provide closures with your code that will receive output values and completions. From there, you can do anything your heart desires with the received events.
sink(_:_:), it simply provides an easy way to attach a subscriber with closures to handle output from a publisher.

let just = Just("Hello world!")
_ = just .sink(
      receiveCompletion: {
        print("Received completion", $0)
      },
      receiveValue: {
        print("Received value", $0)
    })

1.2.2 assign(to:on:)

The assign(to:on:) operator allows you to, without the need of custom code, bind the resulting output to some property on your data model or on a UI control to display the data directly on-screen via a key path. assign(to:on:), the built-in assign(to:on:) operator enables you to assign the received value to a KVO-compliant property of an object.

1.3. Subscribers

Every subscription ends with a subscriber. Subscribers generally do "something" with the emitted output or completion events.

Subscriber protocol:

public protocol Subscriber: CustomCombineIdentifierConvertible {
    associatedtype Input
    associatedtype Failure: Error
    func receive(subscription: Subscription)
    func receive(_ input: Self.Input) -> Subscribers.Demand
    func receive(completion: Subscribers.Completion<Self.Failure>) 
}

1.4. Subscription

The connection between the publisher and the subscriber is the subscription. Here’s the Subscription protocol:

public protocol Subscription: Cancellable, CustomCombineIdentifierConvertible {
    func request(_ demand: Subscribers.Demand) 
}

2. Custom subscriber

final class IntSubscriber: Subscriber {
    typealias Input = Int
    typealias Failure = Never
    func receive(subscription: Subscription) {
        subscription.request(.max(3)) 
    }
    func receive(_ input: Int) -> Subscribers.Demand { 
        print("Received value", input)
        return .none 
    }
    func receive(completion: Subscribers.Completion<Never>) {
        print("Received completion", completion)
    }
}
Posted in iOS, Mobile | Tagged | Leave a comment

Configure Visual Studio Code for Swift development

1. Build sourcekit-lsp

https://github.com/apple/sourcekit-lsp#building-sourcekit-lsp

$ git clone https://github.com/apple/sourcekit-lsp.git
$ swift package update
$ swift build

The sourcekit-lsp will be here:

/Users/zhihuitang/repo/common/sourcekit-lsp/.build/x86_64-apple-macosx/debug/sourcekit-lsp

2. Configure sourcekit-lsp

In the sourcekit-lsp settings, set the Language Server Mode to sourcekit-lsp

Set Server Path:

Posted in iOS | Tagged | Leave a comment

HOW TO RUN VISUAL STUDIO CODE FROM ZSH ON MAC OSX

Adding the codefunction to .zshrc file:

function code {
    if [[ $# = 0 ]]
    then
        open -a "Visual Studio Code"
    else
        local argPath="$1"
        [[ $1 = /* ]] && argPath="$1" || argPath="$PWD/${1#./}"
        open -a "Visual Studio Code" "$argPath"
    fi
}

hen from Terminal you can type:

code – opens Visual Studio Code
code . – opens current directory in Visual Studio Code
code somefile – opens somefile in Visual Studio Code

Posted in Mac | Tagged , | Leave a comment

MongoDB on Mac

1.What’s MongoDB?

MongoDB is a document database which belongs to a family of databases called NoSQL – not only SQL. In MongoDB, records are documents which behave a lot like JSON objects in JavaScript. Values in documents can be looked up by their field’s key. Documents can have some fields/keys and not others, which makes Mongo extremely flexible.

This is different than SQL databases like MySQL and PostgreSQL, where fields correspond to columns in a table and individual records correspond to rows.

2. Install and Run MongoDB with Homebrew

  • Open the Terminal app and type brew update.
  • After updating Homebrew brew install mongodb
  • The install creates:
    the configuration file (/usr/local/etc/mongod.conf)

    systemLog:
        destination: file
        path: /usr/local/var/log/mongodb/mongo.log
        logAppend: true
    storage:
        dbPath: /usr/local/var/mongodb
    net:
        bindIp: 127.0.0.1
    

    the log directory path (/usr/local/var/log/mongodb)
    the data directory path (/usr/local/var/mongodb)

3. Run the MongoDB daemon

In one of your terminal windows run mongod. This should start the Mongo server.
Oops, something is wrong:

[main] Automatically disabling TLS 1.0, to force-enable TLS 1.0 specify --sslDisabledProtocols 'none'
[initandlisten] MongoDB starting : pid=13410 port=27017 dbpath=/data/db 64-bit host=Zhihuis-Mac-mini.local
[initandlisten] db version v4.0.3
[initandlisten] git version: 7ea530946fa7880364d88c8d8b6026bbc9ffa48c
[initandlisten] allocator: system
[initandlisten] modules: none
[initandlisten] build environment:
[initandlisten]     distarch: x86_64
[initandlisten]     target_arch: x86_64
[initandlisten] options: {}
[initandlisten] exception in initAndListen: NonExistentPath: Data directory /data/db not found., terminating
[initandlisten] shutdown: going to close listening sockets...
[initandlisten] removing socket file: /tmp/mongodb-27017.sock
[initandlisten] now exiting
[initandlisten] shutting down with code:100

It complains that exception in initAndListen: NonExistentPath: Data directory /data/db not found.

You can either

  • create the db folder manually by mkdir -p /data/db, Make sure that the /data/db directory has the right permissions by running

    > sudo chown -R `id -un` /data/db
    > # Enter your password
    

    or

  • Specify the mongod.conf when Running the daemon mongod --config /usr/local/etc/mongod.conf. The db file locates in /usr/local/var/log/mongodb

Alternatively, to run MongoDB as a macOS service, issue the following (the process uses the /usr/local/etc/mongod.conf file, created during the install):
brew services start mongodb

4. Connect and Use MongoDB

mongo

5. Exit/Stop the Mongo

To exit the Mongo shell run quit()
To stop the Mongo daemon hit ctrl-c

Reference

Install MongoDB Community Edition on macOS

Posted in Mobile | Tagged | Leave a comment

Python3 Virtualenv Setup

Install python3

brew install python3

Pip3 is installed with Python3

Upgrade virtualenv

To install virtualenv via pip run:

pip install --upgrade virtualenv

Create virtualenv

virtualenv -p python3 python3-venv

Activate the virtualenv

source python3-venv/bin/activate

Deactivate the virtualenv

deactivate
Posted in Mobile | Tagged | Leave a comment

LLDB you should know

LLDB is a next generation, high-performance debugger. It is built as a set of reusable components which highly leverage existing libraries in the larger LLVM Project, such as the Clang expression parser and LLVM disassembler.
LLDB is the default debugger in Xcode on Mac OS X and supports debugging C, Objective-C and C++ on the desktop and iOS devices and simulator.

LLDB syntax:

<command> [<subcommand> [<subcommand>...]] <action> [-options [option-value]] [argument [argument...]]

1. breakpoint

set breakpoints for all some:

breakpoint set -r some

-r: All method names including some will be set breakpoint
-n: All method names with some will be set breakpoint

// set breakpoint for all methods which including `viewDidLo`:
breakpoint set -r viewDidLo

// set breakpoint for all methods `viewDidLoad`:
breakpoint set -n viewDidLoad

// list all breakpoints
breakpoint list

// disable/enable all breakpoints
breakpoint disable/enable

// delete all breakpoints
breakpoint delete

2. register

register read Show current thread General Purpose Register:

(lldb) register read
General Purpose Registers:
       rax = 0x0000000000000001
       rbx = 0x0000000110d16c05  "count"
       rcx = 0x00007ff78b873f28
       rdx = 0x0000000000000000
       rdi = 0x00007ff78a832400
       rsi = 0x0000000120e1cc47  "viewDidLoad"
       rbp = 0x00007ffee43f7150
       rsp = 0x00007ffee43f7150
        r8 = 0x00000000000001ff
        r9 = 0x00006000029266c0
       r10 = 0x0000000000000047
       r11 = 0x000000010b90ff90  Facebook`@objc Facebook.BrowseViewController.viewDidLoad() -> () at <compiler-generated>
       r12 = 0x0000000000000018
       r13 = 0x00007ff78a832400
       r14 = 0x000000012156b9e4  UIKitCore`_UIApplicationLinkedOnVersion
       r15 = 0x0000000110206d80  libobjc.A.dylib`objc_msgSend
       rip = 0x000000010b90ff94  Casino`@objc Facebook.BrowseViewController.viewDidLoad() -> () + 4 at <compiler-generated>
    rflags = 0x0000000000000246
        cs = 0x000000000000002b
        fs = 0x0000000000000000
        gs = 0x0000000000000000

Write a new decimal 124 to current thread rax

register write rax 123

Posted in iOS | Tagged , , | 1 Comment

Xcode instruments

The two columns worth noting in Instruments are # Persistent and # Transient. The Persistent column keeps a count of the number of objects of each type that currently exist in memory. The Transient column shows the number of objects that have existed but have since been deallocated. Persistent objects are using up memory, transient objects have had their memory released.

Posted in iOS, Mobile | Tagged | Leave a comment